How to Research your Antique Home

So you live in old house and you want to learn more about its history.  Perhaps you heard it was a stop on the underground railroad, or you heard George Washington passed by on his way to Trenton, or you are interested in its architecture, whatever your reason may be, it is actually easy to trace your home’s “genealogy.”

The Norfolk County Deeds Office, Dedham (MA)

The best place to start is your county deeds office where land deeds are filed. You can physically go there, but before you do, check to see if they offer online research. That way you can perform your search from the comfort of your own home! The first thing you will need is the book number and the page number where your deed is recorded. You can find that in the Grantor/Grantee index book. Once you have located your deed, read through it. You will find a reference to the book and page number for the sale of your home from when the previous owners purchased it. Keep working your way back until you find it was a piece of land with no structures on it. This will give you a good date for the construction of your house.

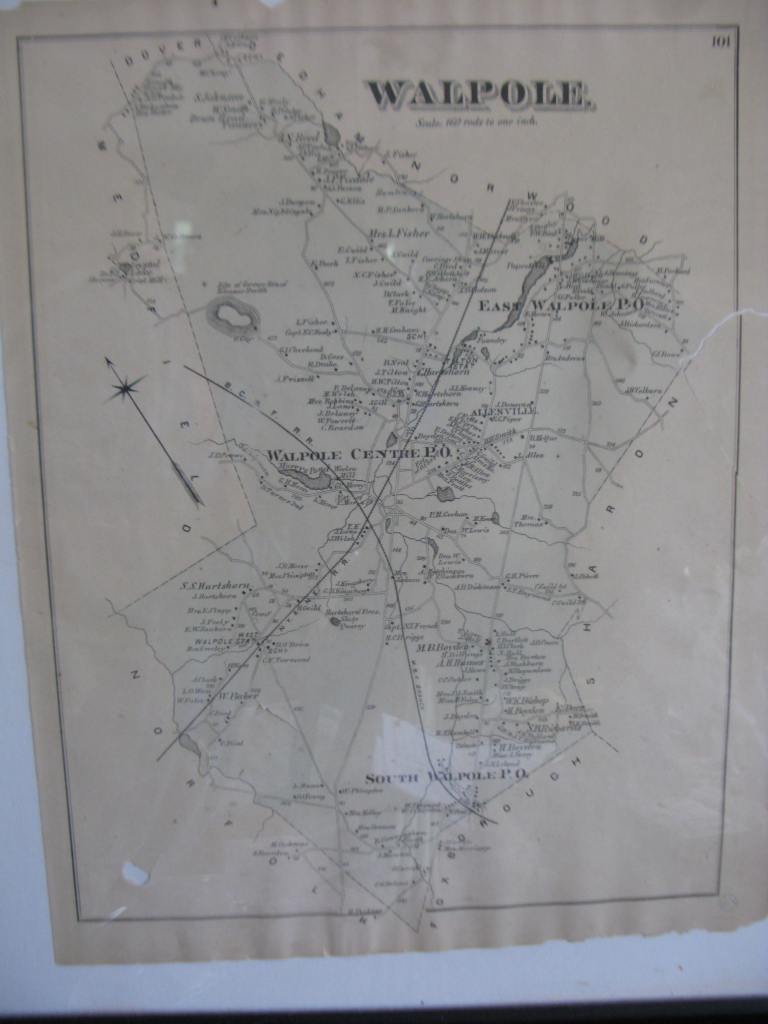
You can also refer to maps. Some maps can be found on file at the county deed office too. Very often when new streets are laid out or a new house or development is to be constructed, builders have to file plans, and those plans often include existing structures. Historical maps are also helpful as they sometimes include the structures, and they may have the added bonus of naming the owner of the home. Looking at maps was extremely helpful for my search, as the property had once been 40 acres, and now is less than one acre. Studying old boundaries and the neighborhood changes over 200 years helped me better understand my property.

Once you know all the owners of your home you can research them. FamilySearch.org will have census records and vital records that will help you reconstruct family who used to live in your home. This technique was very helpful for me. The two daughters of the original owner inherited my house; one daughter had died, so her seven children inherited her half. These children sold their shares back and forth. Following the various purchases and sales was tricky, especially as a few of the transactions were never recorded in county deeds. By reconstructing the family, I was able to figure out the sibling relationships. I also followed up probate court where I pulled wills for the various family members.

Once you have a good picture of the past owners of your home, you can visit your local library or reach out to your local historical society. They may have information on the families who owned your home, they may know if your home has any historical importance, or they may have pictures of your house from way back when.

Visiting your local library may turn up books on local history or general architecture. Having a working knowledge of house styles and trends may also help date your house. How the house is constructed? Is it post and beam? Is it stick built? Is it made from a kit? The answers to these questions will help you confirm the age of your home. It will also help you identify original details you may now want to preserve. I found in a published record that for one season, the original owners of my house allowed it to be the school for the local children. So my house may not really be a schoolhouse….but this is still an interesting tidbit!

My little 1757 Cape Cod style house!

You do not really have to hire a professional to trace the age of your home. Honestly, I do not think it is that hard to do, but it does take time and perseverance. If you do the work, you will know your house’s history, you will not question a finding or wonder if your hired researcher left something out. But mostly you can take pride in your research and know you did a good job!

History Icebreakers: Getting your Group Going!

When starting a program, whether it is for children or for adults, starting with some sort of icebreaker activity can set the stage for a successful presentation. It will help your group ease into the class and feel relaxed and ready to participate. It would be best to first start with an introduction (perhaps give name tags too), and the answer to a question, like how long have you been doing genealogy….or a question that pertains to the theme of the class you are about to teach. Then introduce an icebreaker game before you begin your lesson. Some can be done from the comfort of the participant’s chair, and others (depending on your class) can be done in small groups. Once your students have had an opportunity to “meet” one another, and are feeling at ease, you can start your lesson!

Some Icebreaker Activities:

One of the easiest icebreakers you can do is to have your “class” bring pictures of their families. For young learners, this activity is a foundation to build off of, and for the older learner, it can help strengthen recall. After all, everyone’s favorite topic is “themselves!” Then they can share their pictures and tell the story behind the picture.

Write the name of historical figures on the back of sticky-notes. Put a stick-note on the back of each of your students. They must ask questions about who they think their historical figure may be (yes or no answers). One question per person, that way the speak to everyone in the room. They may remove the stick-note once they have correctly guessed who is their historical figure.

Give out pennies and look at the dates.  Go around the room and share something that occurred for you in the year of the penny.  It can be something about your school history or it can be just about life.  You’ll need a good collection of pennies with recent dates. 

Two Truths and a Lie: you share two things that are true and one lie about yourself and the group tries to guess which one is the lie.  “What you would like to be true?” is the follow up question.

Divide your class into groups of 5-8 students and ask each team to act out a famous scene in history. Each team can choose the scene and the characters they wish to play. As the teams take turns presenting their scene, the “audience” (students not currently performing) try to guess the historic event being portrayed. If time permits, hold a class discussion after each performance, asking the students to contribute historic facts that were not revealed during the skit.

Gone Shopping. (This requires some preparation) You will need 5 to 8 shopping bags. In each shopping bag place a vintage item. They may have a theme, like all clothes, or they may be a combination of items. Also in the shopping bag place a list of discussion questions. What do you think this is? Who

The Cemetery as a Classroom:

I have been going to cemeteries ever since I was a little girl. I would accompany my grandmother on Memorial Day and Veteran’s Day to help her weed and plant flowers. It funny to think, a little girl who was comfortable running between the headstones was a teen who was spooked by cemeteries by simply driving past one! As an adult, I realized how important cemeteries where for genealogists and historians; they held facts and stories of the past. Several years ago, I decided to transcribe the cemeteries in my town as well as the neighboring towns. I put them on line through my local library.

As I got to “know” each little cemetery and the people buried there, I realized what a wonderful classroom they can be! They tell the history of the town.

Lesson Idea:

This is a lesson for kids 9 to 99. (9 year olds are beginning to become abstract thinkers and can comprehend this lesson).

The first thing you will have to do, is to visit your local cemetery. You can do this in person, or via Find A Grave. Plus you will need a working knowledge of your town’s history. If you do not, reach out to the historical society. They may be willing to help you develop this lesson as they too can use it too!

As an example, I will use the Old Parish Cemetery in Norwood, MA. I would start at the gravestone of Rev. Thomas Balch. Which sits on the top of the hill, one of the earliest sections of this cemetery. When Rev. Balch was called to be the minister, the Second Parish of Dedham was officially set off, which essentially was the creation of a new “town.” The first Deacons of the Church are buried here, as well as many of the men who established businesses in the town and helped the town grow, also there are many soldiers, some who fought in the French & Indian War, or the Revolutionary War and the Civil War. As you wind your way down the hill, toward its bottom, the graves are newer, it is like walking on a timeline of Norwood’s history.

As you move through this cemetery, you will notice the gravestone styles change. Stone up to the early 1800s are slate tablets with etchings, in the early 1800s stones were made of white marble and have carvings, by the mid to late 1800s granite became popular, these stones tend to be large and each grave is marked with a footstone. This can also add to your town’s history story as you can discuss the etched and carved meanings of the stones.

There are many topics you can weave into your talk, such as is the Cemetery-Garden movement, and who gave the land to establish the cemetery. As you dig into the history, you may find interesting tidbits of information.

A follow up activity to the cemetery walking tour, you could create a scavenger hunt. Break your class up into groups of 3 to 5. Give them a clipboard and pen to record their findings. On the clipboard is a worksheet with the list of items to find; Gravestone with an angel carved on it, gravestone for someone named Elijah, gravestone for three children, etc. Give the teams a set amount of time to complete the scavenger hunt, and then review their findings.

Genealogy Merit Badge

I have had the pleasure of being a merit badge counselor for Walpole Troop 44 for several years. I helped scouts earn their Fingerprinting, Cooking, Citizenship in the Community, Disabilities Awareness merit badges and yes, the Genealogy merit badge. 

I must say, getting kids interested in their heritage is not an easy task. The Boy Scouts have put together an list of requirements for the genealogy merit badge which if the leader does it correctly, a scout will enjoy working on this badge.

I would recommend working on this badge at a time when families get together….like Thanksgiving. This provides the scout with an opportunity to interview his family.

First, I like to prepare folders for each of the boys. I print copies of pedigree charts and family group sheets, and the Genealogy merit badge requirement worksheets, and provide lined paper for each folder.

At the first meeting have the boys write down the words ancestor, genealogy and descendent, then give them a few minutes to look the words up on their cell phones and write down the definitions. For the next portion of the meeting have the boys brainstorm interview questions. This activity may lead to several interesting discussions. Note, you will want to keep a list of their ideas so you (or a scout) can create a master list of questions for the boys to take with them when their family gathers. This can segue into a discussion of timelines, give the boys some lined paper to write down some of the events that have occurred in their lives. (Homework, have them turn their notes into a proper timeline and have them include a written biography to accompany their timeline). Before you end the session, have them tell you the definition of the three words they looked up at the beginning to the merit badge meeting.

At the second meeting have the boys begin by sharing their timelines and reading their biographies. When all the boys have had a turn, ask them if now they have heard other boys timelines, did that make them think of stuff they left out of their time line. Next have the boys fill in some family group sheets. The boys should know about their own family and perhaps their parent’s families. Then have them begin to fill out a pedigree chart, starting with them selves and go back a few generations. The boys will only be able to get one or two generation back, but not to worry, when the meet with their family, a grandparent may know a few more generations. Give the scouts copies of the complied interview questions they discussed at the last meeting. You can have them look them over and discuss them for a little bit. (Homework, have the boys plan to meet with a family member to be interviewed and to help filling in more family group sheets and extending their pedigree chart.)

Scouts from troop 44 Walpole (MA) take a break to pose for a photograph from working on an Eagle Scout project. (from the collection of Laurie Kerns)

Plan a field trip to the local historical society. Most historical societies have a genealogical repository/library on site, and the historian can show the boys the kinds of books and documents they have in their collections for genealogical research. Perhaps you can arrange for a professional genealogist to be on hand, either in person or online. (Homework, have the boys get a copy of a birth, marriage, death or baptismal certificate and bring a copy (not the original) of it to the next meeting.)

At the next meeting, give the boys an old document, like a will. Challenge them to see if they can read the old handwriting. They may find this activity fun as they struggle to read the document. Then provide the boys with a transcription so they can see/learn about what they were trying to read! Make sure the document has some useful genealogical information in it. Next have the boys present their vital record certificates; also provide a few other documents like obituaries and a death or birth notice, maybe a Bible entry. Have the boys discuss if each document is useful or not for charting a family tree. (Homework, have the boys log on to FamilySearch.org and to findagrave.com to see if they can extend their family trees. Have them bring their research findings and trees to the next meeting along with a few family pictures)

Scouts from Troop 44 Walpole (MA). Drew Cormier, Emerson Kerns, Ben Kerns ans Nick Kearney, are now all Eagle Scouts! (from the collection of Laurie Kerns)

Last meeting, have the boys discuss their findings, both from online and from family interviews. What was the most helpful? Ask how computers and photography has influenced genealogical research. Have them share their trees and tell what they learned about their family. Provide a few sheet protectors to the boys can assemble their findings, interviews, pictures, family group sheets and pedigree charts into a book they can keep.

Link to Genealogy Merit Badge requirements (this link will also give you genealogy charts)

History Mystery Exploration Boxes

Children love to explore. It is how they learn best! You can take them to a museum to show them an historical artifact or a piece of art, and they might have a lovely time, but how much are they going to remember once they have returned home? If you give them an opportunity to roll up their sleeves to handle and use artifacts, they will remember them because they will remember the fun!

Adding History Mystery Boxes to your educational programs is a fantastic way of encouraging your visitors, young and old, to explore your collections, and this will add a whole new demention to your educational programs. They are versatile because they can be switched up in a number of ways. When one History Mystery Box gets old, a new one can be created, keeping them fresh. They can be part of an in-house exhibit, they can be taken to a school as part of an out-reach educational program, or they can be used as part of an in-house educational program.

The idea behind these History Mystery Boxes is rather simple. Before you begin you will want to develop a few learning objectives – what do you want your visitors/students to learn? Let’s say you are interested in creating an exhibit that explores the various behind-the-scene jobs servants performed in a Victorian house. Next you will need a vessel (a box) to put our exploration items in. If this “box” can also be used as part of the collection, all the better! Based on your learning theme begin to find artifacts in your collections to fill the boxes. Make sure the items you select can take a lot of handling, also do not select items that may have a sharp edge, you do not want your visitor/students to get hurt.

Work Around the Victorian House:

BoxItems in the box
Wash tubScrub board
Bar of soap
Iron
Piece of linen/muslin
Darning form
Tool BoxMallet
Measuring stick
Screw driver
Nails
Flour BoxButter press
Cookie cutter
Rolling pin
Apron
Tea pot

Once you have the items for the boxes selected, you will want to create the content that supports your lessons’ objectives. For young children you could provide laminated pictures of the modern equivalent of the artifact in your Mystery Box. Questions such as: What do you notice about the artifact? Is it heavy? What size is it? What do you think it was used for? Encourage them to think like a historian and this may spark a discussion. If you are using the Mystery Boxes in a small group setting, give each group a chance to explore each box. Having a follow up activity to reinforce your lesson. In this case, the children could each receive a sewing card, a laminated card with holes poked in them and a piece of yard (with a tape on one end and a knot on the other), then they can sew!

Mystery Boxes can also be used with seniors. Items selected from your collections should definitely have a theme and you can include items that may be a bit more delicate, and could be part of a PowerPoint presentation. Instead of playing a matching game with your laminated cards, you could use them to see if the seniors can recall the old fashioned name(s) for various artifacts, or the artifact could be displayed on the PowerPoint screen for easy viewing, and seniors could be asked to identify the object. They may even recall a parent or grandparent using the artifact. This may spark a conversation, and if recorded can be part of an oral history which ties into your exhibit.

Mystery Boxes are an excellent way to teach a lesson, show off some of your collections, and allow your visitor/students to interact with your exhibits. They can be tailored to young or old and are a fun and exciting way to create a spark!

Maps as a Learning Tool

Sometimes when teaching the history of your town it can be difficult to engage your students. Here in Massachusetts, the curriculum frame works recommend third graders should learn about their town. Eight-year-olds are just beginning to be aware of and understand things outside of themselves (social, political, and other people’s personal issues). They are becoming less egocentric. This is a good time to start to learn about their town, because it is a place they are familiar with. A local history program can be given at the historical society, the history room at the library, or it can travel to the school, but if the bulk of the program is lecture based, the children may recall very little of what is discussed. Coming up with a program to activity engage the students can be difficult, and if this program needs to travel it can be even trickier. But if students have a hands-on program that is fun, then they will remember the history of their town for many years. Making all your efforts worthwhile.

Activity One: Maps….Old and New

One of the best methods to help students learn about the changes and growth of their town is to use maps. The wonderful thing about maps is that they have been around for hundreds of years, long before photography, and illustrate the changes a town has experienced over time. Select approximately four maps, the earliest should be from about the time your town was established and the newest should be relatively recent. Choose maps that children will find easy to read. Be aware this may be the first time these children may have ever read a map. The maps should also show the same area (neighborhood) over time, in other words, be very similar. You may want to highlight the main road or a particular intersection for ease of locating streets/buildings to help compare the maps to each other. Also, when making copies of the maps, make sure they are all oriented the same, north top of the page and south on the bottom, and number each map. Make plenty of copies so students can work in small groups, and then laminate them for longevity! (plus dry erase markers can be used on lamination)

Other items you may want to have on hand when using map cards, are photographs of landmarks, dry erase markers, and paper towels. Using the map cards, have children compare and contrast the maps.  Can see any changes between map 1 and map 3? Can they note changes from map to map over time? Have them locate something familiar, and circle it. Have them draw a line on an older map showing where a newer road is today. The possibilities are endless with these cards.

Activity Two: Links & Chains

Did you know an acre was once considered to be the area one could plow in a day? As time went on, a particular size was settled on (43,560 sq ft, which is a little bit smaller than a football field) and surveyors were hired to measure the land and to draw maps. In fact, George Washington was a surveyor and his surveying equipment is on display at Mount Vernon.

For this activity you will need: paper and a pencil, a measuring tape, a kit with chains and rods, six stakes (or orange cones) to mark out the space (length) that children will measure, and a couple of land deeds (one that lays out the area in links and chains and one that lays out the area in feet). Have a copy of the original deed, but also provide a transcription so the children can easily read the deed.

Preparation: The children will be measuring three similar lengths. Set the stakes (or cones) out, one is the starting point and the other the end. Before the children measure these lengths, have them read the deed cards and discuss the different ways measurement is recorded. Ask why they think it is important to have a standard form of measurement.

Break the children up into three groups for the measuring activity. The first length will be measured using the students’ feet in heel-toe style, the second using the measuring tape, and the third using links & chains. Have each group rotate through each measuring activity so they all have an opportunity to try each type of measurements. Gather the children together to discuss their findings and again ask if they think it is important to have a standard form of measurement.

Historical Note: A Chain is 66 feet, there are 100 links in the chain, there are 4 rods in a chain. (A chain is a little less than a ¼ the length of a football field.)

An accurate chain is not necessary for this activity. It would be too heavy and difficult for children to handle. You will find a chain at your local hardware store. It is more important to have a chain with 100 links in it, even if it does not measure 66 feet.

Activity Three: Make a map of your neighborhood

The Norwood Historical Society (MA) has in its collection a map hand drawn by a resident (circa 1900) that shows how the town looked in 1840 how this resident remembered it. He notes homes, roads and businesses. It is a wonderful piece of memorabilia. Have the children draw a map of their neighborhood. Then take their maps to add to your historical society’s collections so some day a researcher will study them and perhaps use them as part of their project.